Ubuntu NAS cheat sheet
Preparation link
Creating a USB install stick from Windows link
- Download the Ubuntu Server ISO (manual server installation)
- Download and run Rufus
- Select GPT from the Partition scheme drop-down menu
- Click START and select DD Image mode
Note: when selecting the USB stick in the motherboard boot menu, make sure to select the entry that starts with "UEFI:" to boot in UEFI mode.
Installation link
Follow the installation wizard as normal until you get to "Guided storage configuration":
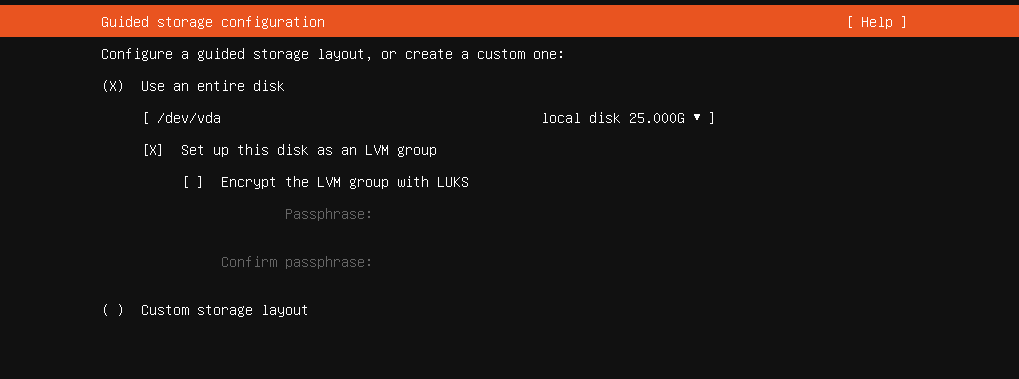
Enable "Encrypt the LVM group with LUKS".
Install OpenSSH as part of the wizard, but don't import SSH keys.
After the wizard is finished, setup SSH user keys:
mkdir ~/.ssh
curl https://github.com/<username>.keys > ~/.ssh/authorized_keys
Edit /etc/ssh/sshd_config and change the following config lines as follows:
ChallengeResponseAuthentication no
UsePAM no
PasswordAuthentication no
PermitRootLogin no
Then restart the SSH server:
systemctl restart sshEnsure the root volume/filesystem fills the disk link
The install wizard may have improperly undersized your root volume/filesystem, so we want to extend it to fill the remaining disk space:
# Resize the logical volume to use all the existing and free space of the volume group
sudo lvextend -l +100%FREE /dev/ubuntu-vg/ubuntu-lv
# Resize the file system to use the new available space in the logical volume
sudo resize2fs /dev/ubuntu-vg/ubuntu-lv
Setup remote unlock for disk encryption on boot link
Since most of the boot disk is encrypted, we can't wait until openssh-server is ready to unlock encrypted volumes. Normally, you'll be prompted to unlock encrypted volumes at boot time but that's not feasible with a headless server.
Instead, we'll install dropbear-initramfs, a package that installs a minimal SSH server with BusyBox into the initramfs environment, allowing a remote user to SSH in to unlock encrypted volumes during the boot process.
Setup server link
Install dropbear-initramfs:
sudo apt install dropbear-initramfsWhen you install the package, it might show warnings because you haven't configured it properly yet.
Copy your user's authorized_keys to /etc/dropbear/initramfs/:
sudo cp ~/.ssh/authorized_keys /etc/dropbear/initramfs/authorized_keysBecause Dropbear generates its own separate SSH host keys, SSH clients will warn you about host key changes if you connect to both Dropbear and the regular OpenSSH server using the same IP + port. Let's change the SSH port that Dropbear uses:
echo "DROPBEAR_OPTIONS=\"-p 8745\"" | sudo tee -a /etc/dropbear/initramfs/dropbear.confTo save our Dropbear configuration, just regenerate the initramfs image and reboot:
sudo update-initramfs -u
sysmtectl reboot
If using DHCP static leases, you should add this config block to your systemd network config in /etc/systemd/network/<network>.conf:
[DHCPv4]
ClientIdentifier=duid
IAID=1497975254
DUIDType=link-layer
What we're doing here is configuring our normal network config to match Dropbear's initramfs DHCP config. Dropbear's DHCP config uses IAID to request an IP address, but when the normal system boots and tries to request an IP address, it must use the same DHCP config and IAID otherwise the DHCP server will refuse to provide an IP address (it literally ignores the DHCP request because without the same IAID, it thinks it's a different machine trying to steal Dropbear's DHCP lease).
The IAID should be based on the network interface and will change if the network interface changes.
Change CPU governor to "performance" link
Install cpufrequtils:
sudo apt-get install cpufrequtilsThen edit the /etc/default/cpufrequtils file (if it doesn't exist, create it) to add the following line :
GOVERNOR="performance"Restart the systemd service:
sudo systemctl restart cpufrequtilsSetup user-mode systemd link
Automatic start-up of systemd user instances:
loginctl enable-linger <username>Remotely unlock encrypted volumes via SSH link
When the server boots, it will now start up the Dropbear SSH server while it waits for keyboard input to enter encrypted volume passwords. While it's waiting, you can SSH into this machine to unlock it, which will cause the machine to resume booting.
SSH into the machine as root on port 8745:
ssh root@<ip> -p 8745In your SSH session, run cryptroot-unlock which will prompt you for the encrypted volume passwords:
cryptroot-unlockIf your encrypted volumes unlocked successfully, the SSH session should quickly terminate.
Detailed guide: https://hamy.io/post/0009/how-to-install-luks-encrypted-ubuntu-18.04.x-server-and-enable-remote-unlocking/
Enable trim on the primary encrypted volume link
Increase periodic TRIM frequency by modifying the systemd timer:
sudo systemctl edit --full fstrim.timer
sudo systemctl daemon-reload
Modify these two lines to make it hourly:
[Timer]
OnCalendar=hourly
AccuracySec=1min
Tune TCP settings link
Create a file /etc/sysctl.d/98-tcp.conf with the following contents:
# allow TCP with buffers up to 256MB
net.core.rmem_max = 268435456
net.core.wmem_max = 268435456
# increase Linux autotuning TCP buffer limit to 32MB
net.ipv4.tcp_rmem = 4096 524288 33554432
net.ipv4.tcp_wmem = 4096 524288 33554432
# recommended for hosts with jumbo frames enabled
net.ipv4.tcp_mtu_probing=1
# recommended to use a 'fair queueing' qdisc (either fq or fq_codel)
net.core.default_qdisc = fq_codel
# do not use tcp_congestion_control=bbr, it is broken
net.ipv4.tcp_congestion_control = cubic
(to learn more: https://fasterdata.es.net/host-tuning/linux/)
Run sysctl -p to apply the changes.
Setup X11 forwarding to run GUI apps link
You can SSH into the server and run GUI apps by setting the DISPLAY env var to point to your Windows machine IP address.
Install vcxsrv on Windows link
Install VcXsrv from https://sourceforge.net/projects/vcxsrv/
Launch "XLaunch" from the start menu and configure it:
- Multiple Windows
- Start no client
- disable "Native opengl"
- enable "Disable access control"
Note: sourced from https://stackoverflow.com/questions/61110603/how-to-set-up-working-x11-forwarding-on-wsl2
Install Filebot link
Install the filebot apt repository & package:
curl https://raw.githubusercontent.com/filebot/plugins/master/installer/deb.sh > install_filebot.sh

# see https://github.com/filebot/plugins/issues/19
sed -i 's/gnupg\-curl/curl\ gnupg/g' install_filebot.sh

chmod +x install_filebot.sh
./install_filebot.sh
Check that filebot is configured with Unicode instead of ANSI encoding:
# https://www.filebot.net/forums/viewtopic.php?p=25742#p25742
filebot -script fn:sysenv | grep sun.jnu.encoding
If it's using ANSI, make sure your locale is setup correctly: https://perlgeek.de/en/article/set-up-a-clean-utf8-environment
Run Filebot link
In the SSH session, run the following command:
# use the IP address of your Windows computer
DISPLAY=192.168.86.88:0.0 LIBGL_ALWAYS_INDIRECT=0 JAVA_OPTS="-Dsun.java2d.xrender=True -Dawt.useSystemAAFontSettings=on" filebot
That's it, filebot should start!
Note: use the {plex} format for episode & movie format in Filebot, eg:
{home}/media/plex_symlinks/{plex}Install & run IntelliJ IDEA Ultimate link
sudo snap install intellij-idea-ultimate --classic

# this is the run command
# note that Java options are set using _JAVA_OPTIONS instead of JAVA_OPTS
DISPLAY=192.168.86.88:0.0 LIBGL_ALWAYS_INDIRECT=0 _JAVA_OPTIONS="-Dsun.java2d.xrender=True -Dawt.useSystemAAFontSettings=on" intellij-idea-ultimate
Install & run Sublime Merge link
curl -fsSL https://download.sublimetext.com/sublimehq-pub.gpg | sudo gpg --dearmor -o /usr/share/keyrings/sublimehq-pub.gpg
echo "deb [signed-by=/usr/share/keyrings/sublimehq-pub.gpg] https://download.sublimetext.com/ apt/stable/" | sudo tee -a /etc/apt/sources.list.d/sublime-text.list
sudo apt update
sudo apt install sublime-merge

# this is the run command
DISPLAY=192.168.86.88:0.0 LIBGL_ALWAYS_INDIRECT=0 smerge
Run X11 forwarded app in a detached screen
link
Example run_filebot.sh script:
#!/bin/bash
screen -S filebot -dm bash -c 'DISPLAY=192.168.86.88:0.0 LIBGL_ALWAYS_INDIRECT=0 JAVA_OPTS="-Dsun.java2d.xrender=True -Dawt.useSystemAAFontSettings=on" /usr/bin/filebot'
Setup headless X2Go for single application sessions link
X2Go uses X11-forwarding over SSH to support remote desktop use cases. A local XOrg or desktop environment installation is not strictly required, although that generally restricts it to single application use.
Install X2Go on the server:
sudo apt-get install x2goserver x2goserver-xsessionThat's it for the server! Installing those packages will start and enable the x2goserver systemd service automatically.
To connect to X2Go from Windows, you need to download the Windows client from their releases page. Make sure SSH is setup correctly because X2Go connects via SSH. Arch Linux has an official x2goclient package.
Remotely run Filebot GUI over X2Go link
Install the filebot apt repository & package:
curl https://raw.githubusercontent.com/filebot/plugins/master/installer/deb.sh > install_filebot.sh

# see https://github.com/filebot/plugins/issues/19
sed -i 's/gnupg\-curl/curl\ gnupg/g' install_filebot.sh

chmod +x install_filebot.sh
./install_filebot.sh
In your X2Go client, create a session with the session type "Single application" and command /usr/bin/filebot.
Remotely run Filebot GUI in ChromeOS Linux link
Create and run a bash script named remote_filebot.sh in the Linux Terminal:
#!/bin/bash
FILEBOT_COMMAND="GDK_DPI_SCALE=0.5 LIBGL_ALWAYS_INDIRECT=0 JAVA_OPTS=\"-Dsun.java2d.xrender=True -Dawt.useSystemAAFontSettings=on\" /usr/bin/filebot"
DISPLAY=${DISPLAY_LOW_DENSITY} ssh -X josh@oni.varbaking.dev ${FILEBOT_COMMAND}
Setup Bazel Buildfarm link
https://github.com/bazelbuild/bazel-buildfarm
sudo apt install python default-jdk-headless

bazel run //src/main/java/build/buildfarm:buildfarm-server -- ~/Documents/bazel-buildfarm/examples/server.config.example

bazel run //src/main/java/build/buildfarm:buildfarm-operationqueue-worker -- ~/Documents/bazel-buildfarm/examples/worker.config.example --root ~/Documents/bazelroot --cas_cache_directory ~/Documents/bazelcache
Setup Phoronix Test Suite link
Download & install the deb package from the website https://www.phoronix-test-suite.com/?k=downloads:
# example URL, copy the link address using a browser from the "Ubuntu/Debian Package" download button
wget http://phoronix-test-suite.com/releases/repo/pts.debian/files/phoronix-test-suite_10.2.0_all.deb
sudo apt install ./phoronix-test-suite_10.2.0_all.deb
Install dependencies for Phoromatic:
sudo apt install php-sqlite3 php-ssh2Edit /etc/phoronix-test-suite.xml file and set its XML options as follows:
<LimitAccessToLocalHost>TRUE</LimitAccessToLocalHost>
<RemoteAccessPort>9234</RemoteAccessPort>
<WebSocketPort>9235</WebSocketPort>
Start and enable the phoromatic-server systemd service:
sudo systemctl start phoromatic-server
sudo systemctl enable phoromatic-server
Create a systemd service file /etc/systemd/system/phoromatic-connect.service to automatically connect to the Phoromatic server:
[Unit]
Description=Connect to the local Phoromatic server

[Service]
# the "/EI5RMG" URL path is an example, login to the Phoromatic server and go to the "Main" page to see proper URL path
ExecStart=/usr/bin/phoronix-test-suite phoromatic.connect 127.0.0.1:9234/EI5RMG

[Install]
WantedBy=multi-user.target
Load, start, and enable the systemd service:
sudo chmod 664 /etc/systemd/system/phoromatic-connect.service
sudo systemctl daemon-reload
sudo systemctl start phoromatic-connect
sudo systemctl enable phoromatic-connect
WARNING: If you stop phoromatic-server without also stopping phoromatic-connect, it will auto-reboot your machine after some time because it thinks the network is down (see https://github.com/phoronix-test-suite/phoronix-test-suite/issues/278)
Run a memory stress test using stressapptest link
Install "Stressful Application Test" (also available in Phoronix Test Suite):
sudo apt install stressapptestRun the test for eg. 30 seconds:
stressapptest -W -s 30Setting up an encrypted ZFS + LUKS storage pool link
Encrypting devices with dm-crypt and LUKS link
Install required packages:
# keyutils installs /lib/cryptsetup/scripts/decrypt_keyctl, which accepts one password and caches it for multiple devices
sudo apt install keyutils
For each /dev/sdX device, format the drive with LUKS and then add it to /etc/crypttab:
sudo cryptsetup luksFormat /dev/sda
echo "yomi1 UUID=$(lsblk -no UUID /dev/sda) none luks,initramfs,keyscript=decrypt_keyctl" | sudo tee -a /etc/crypttab
After you've added all your drives to /etc/crypttab, update your initramfs:
# you might see "No such device" errors, but don't worry about it
sudo update-initramfs -u
# you should reboot to verify your initramfs auto-mount works
sudo systemctl reboot
List your unlocked devices:
sudo dmsetup lsSetup ZFS storage pool link
https://arstechnica.com/information-technology/2020/05/zfs-101-understanding-zfs-storage-and-performance/
Install ZFS:
sudo apt install zfsutils-linuxCreate a zpool with a RAIDZ-2 vdev using ashift=13 (equivalent to 8KB sector size):
# we use the mapped device that LUKS provides, eg. /dev/mapper/yomi1
sudo zpool create yomi raidz2 -oashift=13 /dev/mapper/yomi1 /dev/mapper/yomi2 #...
Create & mount a zfs dataset with compression enabled:
sudo zfs create yomi/media
sudo zfs set compression=lz4 yomi/media
sudo zfs set xattr=sa yomi/media
sudo zfs set mountpoint=/home/josh/media yomi/media
sudo zfs set acltype=posixacl yomi/media
sudo chown josh /home/josh/media
chmod 777 /home/josh/media
To reduce the likelihood of a ZFS silent corruption bug (https://news.ycombinator.com/item?id=38405731), you should disable zfs_dmu_offset_next_sync.
To check if the option is enabled:
cat /sys/module/zfs/parameters/zfs_dmu_offset_next_sync
# it should be 1 by default, we want it to be 0
This ZFS parameter can't be set dynamically, you must create a new file called /etc/modprobe.d/zfs.conf and put this into it:
options zfs zfs_dmu_offset_next_sync=0Then reboot.
(possible script that detects 4KB of null bytes in files: https://github.com/openzfs/zfs/issues/15526#issuecomment-1826075625)
Replacing a bad disk in ZFS link
- Identify the name of the LUKS device (eg
yomi3) associated with the bad disk.zpool statuscan show you which LUKS device it believes is broken- If you know which
/dev/sdXdisk device is bad (eg from SMART tests), you can figure out what the associated LUKS device is called by runninglsblkto see the name of the associatedcrypttype device. - If the disk is so broken it doesn't even connect, that means its LUKS device also didn't get created and
zpool statuswill tell you which LUKS device is missing.
- Take the LUKS device offline in the zpool:
sudo zpool offline yomi yomiX - Comment out the line in
/etc/crypttabthat mounts the LUKS device and regenerate the initramfs (sudo update-initramfs -u) - Shutdown
sudo systemctl poweroff - Physically replace the bad disk with a new disk
- Boot up
- Run a SMART test on the new disk to make sure it's healthy (
sudo smartctl -t short /dev/sdX) - Create a new LUKS device on the new disk and add it to
/etc/crypttabwith the same name of the LUKS device you're replacing, eg:sudo cryptsetup luksFormat /dev/sdX echo "yomiX UUID=$(lsblk -no UUID /dev/sdX) none luks,initramfs,keyscript=decrypt_keyctl" | sudo tee -a /etc/crypttab # disregard any "No such device" errors sudo update-initramfs -u - Reboot to make sure your new LUKS device unlocks properly on boot
sudo systemctl reboot - Replace the LUKS device in the zpool by running
sudo zpool replace yomi yomiX
Serve a Samba share for the zfs dataset link
Install Samba:
sudo apt install sambaSet a Samba-specific password for your existing Linux user:
sudo smbpasswd -a joshCreate a Samba directory to mount your media directory into:
sudo mkdir -p /srv/samba/mediaAuto-mount your zfs dataset into the Samba directory with /etc/fstab:
# Samba bind-mount of /media
/home/josh/media /srv/samba/media none bind 0 0
Apply your fstab:
sudo mount -aCreate a file /etc/samba/smb.conf that looks like this:
[global]
	workgroup = joshiba
	server string = Samba %v on (%L)
	hosts allow = 192.168.86. 127. localhost fc00::/7
	load printers = no
	printing = bsd
	printcap name = /dev/null
	disable spoolss = yes
	show add printer wizard = no

[media]
	comment = Media drive
	path = /srv/samba/media
	public = yes
	writable = no
	printable = no
	write list = josh
Verify Samba config file by checking output of command:
testparmStart Samba server:
sudo systemctl start smbdConfigure Samba server to start on boot:
sudo systemctl enable smbdServe a NFS share for the ZFS dataset link
Install NFS:
sudo apt install nfs-kernel-serverCreate an NFS directory to mount your media directory into:
sudo mkdir -p /srv/nfs/mediaAppend this section to your /etc/fstab:
# NFS bind-mount of /media
/home/josh/media /srv/nfs/media none bind 0 0
Apply your fstab:
sudo mount -aModify the NFS config file /etc/exports to look like this:
/srv/nfs           192.168.0.0/24(rw,sync,crossmnt,no_subtree_check,all_squash,anonuid=1000,anongid=1000,fsid=0)
/srv/nfs           192.168.86.0/24(rw,sync,crossmnt,no_subtree_check,all_squash,anonuid=1000,anongid=1000,fsid=0)
/srv/nfs           10.69.69.0/24(rw,sync,crossmnt,no_subtree_check,all_squash,anonuid=1000,anongid=1000,fsid=0)
/srv/nfs/media     192.168.0.0/24(rw,sync,no_subtree_check,all_squash,anonuid=1000,anongid=1000,fsid=0)
/srv/nfs/media     192.168.86.0/24(rw,sync,no_subtree_check,all_squash,anonuid=1000,anongid=1000,fsid=0)
/srv/nfs/media     10.69.69.0/24(rw,sync,no_subtree_check,all_squash,anonuid=1000,anongid=1000,fsid=0)
/srv/nfs/downloads 192.168.0.0/24(rw,sync,no_subtree_check,all_squash,anonuid=1000,anongid=1000,fsid=0)
/srv/nfs/downloads 192.168.86.0/24(rw,sync,no_subtree_check,all_squash,anonuid=1000,anongid=1000,fsid=0)
/srv/nfs/downloads 10.69.69.0/24(rw,sync,no_subtree_check,all_squash,anonuid=1000,anongid=1000,fsid=0)
Apply the NFS config:
sudo exportfs -rav(Optional) Configure the NFS max block size: https://wiki.archlinux.org/title/NFS#Performance_tuning
Start NFS server:
sudo systemctl start nfs-serverConfigure NFS server to start on boot:
sudo systemctl enable nfs-serverMounting NFS on Windows link
Open the HKEY_LOCAL_MACHINE\SOFTWARE\Microsoft\ClientForNFS\CurrentVersion\Default registry key folder and create two new DWORD (32-bit) values:
AnonymousUid: set it to the user ID of your Linux NFS shareAnonymousGid: set it to the group ID of your Linux NFS share
Open the HKEY_LOCAL_MACHINE\SOFTWARE\Microsoft\Windows\CurrentVersion\Policies\System registry key folder and create a new DWORD entry with the name EnableLinkedConnections and value 1.
Open Terminal in Administrator Mode and enable Remote symlink permissions:
fsutil behavior set SymlinkEvaluation R2R:1
fsutil behavior set SymlinkEvaluation R2L:1
fsutil behavior query SymlinkEvaluation
Open the Group Policy editor and add your local user to the "Create symbolic links" (SeCreateSymbolicLinkPrivilege) policy following these instructions: https://docs.microsoft.com/en-us/windows/security/threat-protection/security-policy-settings/create-symbolic-links
You have to reboot Windows after these changes.
Mount the NFS share using the share's root path on the server, eg:
mount -o anon \\oni.varbaking.dev\srv\nfs\media Z:Setup a monthly ZFS scrub link
TODO: not finished
Modify /etc/zfs/zed.d/zed.rc to un/comment and set the following options:
ZED_DEBUG_LOG="/tmp/zed.debug.log"
# ZED_EMAIL_ADDR="root"
ZED_NOTIFY_INTERVAL_SECS=1
ZED_NOTIFY_VERBOSE=1
ZED_USE_ENCLOSURE_LEDS=1
Restart the zfs-zed service to pick up the changes:
sudo systemctl restart zedReplacing a failed disk link
Run zpool status to see which yomi<x> volume is broken, eg:
josh@oni:~$ zpool status
  pool: yomi
 state: DEGRADED
status: One or more devices are faulted in response to persistent errors.
  Sufficient replicas exist for the pool to continue functioning in a
  degraded state.
action: Replace the faulted device, or use 'zpool clear' to mark the device
  repaired.
  scan: resilvered 57.1M in 00:00:08 with 0 errors on Tue Jul  4 23:53:40 2023
config:

  NAME        STATE     READ WRITE CKSUM
  yomi        DEGRADED     0     0     0
    raidz2-0  DEGRADED     0     0     0
      yomi1   ONLINE       0     0     0
      yomi2   FAULTED      4    75     0  too many errors
      yomi3   ONLINE       0     0     0
      yomi4   ONLINE       0     0     0
      yomi5   ONLINE       0     0     0
      yomi6   ONLINE       0     0     0
      yomi7   ONLINE       0     0     0
      yomi8   ONLINE       0     0     0

errors: No known data errors
Look in the /etc/crypttab file to find the UUID of the failed yomi<x> volume, eg:
josh@oni:~$ cat /etc/crypttab
dm_crypt-0 UUID=68b75c4e-f59a-4318-a27a-32004f830230 none luks
yomi1 UUID=3acb89a2-f653-40ce-b3b3-6fc1bb6940e6 none luks,initramfs,keyscript=decrypt_keyctl
yomi2 UUID=597d011e-f1be-4336-902a-7645db01a433 none luks,initramfs,keyscript=decrypt_keyctl
yomi3 UUID=852520b1-dc05-40be-8c9c-9688699cb8eb none luks,initramfs,keyscript=decrypt_keyctl
...
Find the hardware serial number of the failed disk with smartctl, or if smartctl doesn't work (which is likely), you can use udevadm so you can identify the correct disk to remove:
udevadm info --query=all --name=/dev/disk/by-uuid/597d011e-f1be-4336-902a-7645db01a433 | grep -e ID_SERIAL -e ID_MODELOr hdparm:
sudo hdparm -I /dev/disk/by-uuid/597d011e-f1be-4336-902a-7645db01a433 | grep -e Model -e Serial\ NMark the yomi<x> volume offline in the zfs pool:
sudo zpool offline yomi yomi2Comment out the line containing the specific yomi<x> volume from /etc/crypttab, eg:
dm_crypt-0 UUID=68b75c4e-f59a-4318-a27a-32004f830230 none luks
yomi1 UUID=3acb89a2-f653-40ce-b3b3-6fc1bb6940e6 none luks,initramfs,keyscript=decrypt_keyctl
# yomi2 UUID=597d011e-f1be-4336-902a-7645db01a433 none luks,initramfs,keyscript=decrypt_keyctl
yomi3 UUID=852520b1-dc05-40be-8c9c-9688699cb8eb none luks,initramfs,keyscript=decrypt_keyctl
...
After you've modified /etc/crypttab, update your initramfs:
sudo update-initramfs -uShutdown the server and physically replace the drive.
For the new /dev/sdX device (can run lsblk -a and see the /dev/sdX that is missing a yomi<x> volume), format the drive with LUKS and then add it to /etc/crypttab:
sudo cryptsetup luksFormat /dev/sdf
echo "yomi2 UUID=$(lsblk -no UUID /dev/sdf) none luks,initramfs,keyscript=decrypt_keyctl"
After you've added all your drives to /etc/crypttab, update your initramfs and reboot:
sudo update-initramfs -u
sudo systemctl reboot
Replace the volume in the zfs pool:
zpool replace yomi /dev/mapper/yomi2Setup a Plex server link
Using podman quadlet link
Create a quadlet container file /etc/containers/systemd/plex.container:
[Unit]
Description=Plex Media Server container
Wants=network-online.target
After=network-online.target
After=zfs-mount.service

[Service]
Restart=on-failure
TimeoutStopSec=70

[Container]
ContainerName=plex
Image=ghcr.io/linuxserver/plex:latest
AutoUpdate=registry
Network=host
AddDevice=/dev/kfd
AddDevice=/dev/dri
Environment=PUID=1000
Environment=PGID=1000
Environment=VERSION=docker
Volume=/home/josh/plex/config:/config
Volume=/home/josh/media/downloads:/media/downloads
Volume=/home/josh/media/manual_downloads:/media/manual_downloads
Volume=/home/josh/media/plex_symlinks:/media/plex_symlinks

[Install]
WantedBy=default.target
Generate and start the quadlet:
sudo systemctl daemon-reload
sudo systemctl start plex
Easily the update container image:
sudo podman auto-updateSetup a Komga manga server link
Using podman link
Create a systemd service file /etc/systemd/system/komga.service:
[Unit]
Description=Start Komga container
Wants=network-online.target
After=network-online.target
After=zfs-mount.service
RequiresMountsFor=%t/containers

[Service]
Environment=PODMAN_SYSTEMD_UNIT=%n
Restart=on-failure
TimeoutStopSec=70
ExecStartPre=/bin/rm -f %t/%n.ctr-id
ExecStart=/usr/bin/podman run \
  --security-opt=apparmor=podman \
  --cidfile=%t/%n.ctr-id \
  --replace \
  --sdnotify=conmon \
  --cgroups=no-conmon \
  --rm \
  -d \
  --mount type=bind,source=/home/josh/media/komga/config,target=/config \
  --mount type=bind,source=/home/josh/media/komga/manga,target=/komga/manga \
  --mount type=bind,source=/home/josh/media/downloads,target=/downloads \
  --mount type=bind,source=/home/josh/media/manual_downloads,target=/manual_downloads \
  -v /etc/timezone:/etc/timezone:ro \
  -p 8217:8080 \
  -u 1000:1000 \
  -e SERVER_SERVLET_CONTEXT_PATH=/komga/ \
  -e SERVER_PORT=8080 \
  --name komga \
  docker.io/gotson/komga:1.24.4
ExecStop=/usr/bin/podman stop --ignore --cidfile=%t/%n.ctr-id
ExecStopPost=/usr/bin/podman rm -f --ignore --cidfile=%t/%n.ctr-id
Type=notify
NotifyAccess=all

[Install]
WantedBy=default.target
Load, start, and enable the systemd service:
sudo chmod 664 /etc/systemd/system/komga.service
sudo systemctl daemon-reload
sudo systemctl start komga
sudo systemctl enable komga
Setup a Audiobookshelf server link
Using podman link
Create a systemd service file /etc/systemd/system/audiobookshelf.service:
[Unit]
Description=Start Audiobookshelf container
Wants=network-online.target
After=network-online.target
After=zfs-mount.service
RequiresMountsFor=%t/containers

[Service]
Environment=PODMAN_SYSTEMD_UNIT=%n
Restart=on-failure
TimeoutStopSec=70
ExecStartPre=/bin/rm -f %t/%n.ctr-id
ExecStart=/usr/bin/podman run \
  --cidfile=%t/%n.ctr-id \
  --replace \
  --sdnotify=conmon \
  --cgroups=no-conmon \
  --rm \
  -d \
  -e AUDIOBOOKSHELF_UID=1000 \
  -e AUDIOBOOKSHELF_GID=1000 \
  -p 13378:80 \
  -v /home/josh/media/downloads:/downloads \
  -v /home/josh/media/audiobookshelf/audiobooks:/data/audiobooks \
  -v /home/josh/media/audiobookshelf/podcasts:/data/podcasts \
  -v /home/josh/media/audiobookshelf/config:/config \
  -v /home/josh/media/audiobookshelf/metadata:/metadata \
  --name audiobookshelf \
  ghcr.io/advplyr/audiobookshelf:latest
ExecStop=/usr/bin/podman stop --ignore --cidfile=%t/%n.ctr-id
ExecStopPost=/usr/bin/podman rm -f --ignore --cidfile=%t/%n.ctr-id
Type=notify
NotifyAccess=all

[Install]
WantedBy=default.target
Load, start, and enable the systemd service:
sudo chmod 664 /etc/systemd/system/audiobookshelf.service
sudo systemctl daemon-reload
sudo systemctl start audiobookshelf
sudo systemctl enable audiobookshelf
Setup UniFi Network Application link
Detailed docs in https://github.com/linuxserver/docker-unifi-network-application
Using podman link
Create dirs:
mkdir -p ~/unifi/mongo
mkdir -p ~/unifi/config
Create a MongoDB init script ~/unifi/init-mongo.sh
#!/bin/bash

if which mongosh > /dev/null 2>&1; then
  mongo_init_bin='mongosh'
else
  mongo_init_bin='mongo'
fi
"${mongo_init_bin}" <<EOF
use ${MONGO_AUTHSOURCE}
db.auth("${MONGO_INITDB_ROOT_USERNAME}", "${MONGO_INITDB_ROOT_PASSWORD}")
db.createUser({
  user: "${MONGO_USER}",
  pwd: "${MONGO_PASS}",
  roles: [
    { db: "${MONGO_DBNAME}", role: "dbOwner" },
    { db: "${MONGO_DBNAME}_stat", role: "dbOwner" }
  ]
})
EOF
Mark it executable chmod +x ~/unifi/init-mongo.sh
Create a systemd service file /etc/systemd/system/mongo-unifi.service, filling in your own password into the env var UNIFI_MONGOPW:
[Unit]
Description=Start MongoDB container for UniFi Network Application
Wants=network-online.target
After=network-online.target
RequiresMountsFor=%t/containers

[Service]
Environment=PODMAN_SYSTEMD_UNIT=%n
Environment=UNIFI_MONGOPW=
Restart=on-failure
TimeoutStopSec=70
ExecStartPre=/bin/rm -f %t/%n.ctr-id
ExecStart=/usr/bin/podman run \
  --cidfile=%t/%n.ctr-id \
  --replace \
  --sdnotify=conmon \
  --cgroups=no-conmon \
  --rm \
  -d \
  -e MONGO_INITDB_ROOT_USERNAME=root \
  -e MONGO_INITDB_ROOT_PASSWORD=$UNIFI_MONGOPW \
  -e MONGO_USER=unifi \
  -e MONGO_PASS=$UNIFI_MONGOPW \
  -e MONGO_DBNAME=unifi \
  -e MONGO_AUTHSOURCE=admin \
  -p 8956:27017 \
  -v /home/josh/unifi/mongo:/data/db \
  -v /home/josh/unifi/init-mongo.sh:/docker-entrypoint-initdb.d/init-mongo.sh:ro \
  --name mongo-unifi \
  docker.io/mongo:7.0
ExecStop=/usr/bin/podman stop --ignore --cidfile=%t/%n.ctr-id
ExecStopPost=/usr/bin/podman rm -f --ignore --cidfile=%t/%n.ctr-id
Type=notify
NotifyAccess=all

[Install]
WantedBy=default.target
Create a systemd service file /etc/systemd/system/unifi.service, filling in your own password into the env var UNIFI_MONGOPW:
[Unit]
Description=Start UniFi Network Application container
Wants=mongo-unifi.service
After=network-online.target
RequiresMountsFor=%t/containers

[Service]
Environment=PODMAN_SYSTEMD_UNIT=%n
Environment=UNIFI_MONGOPW=
Restart=on-failure
TimeoutStopSec=70
ExecStartPre=/bin/rm -f %t/%n.ctr-id
ExecStart=/usr/bin/podman run \
  --cidfile=%t/%n.ctr-id \
  --replace \
  --sdnotify=conmon \
  --cgroups=no-conmon \
  --network=host \
  --rm \
  -d \
  -e PUID=1000 \
  -e PGID=1000 \
  -e TZ=Etc/UTC \
  -e MONGO_USER=unifi \
  -e MONGO_PASS=$UNIFI_MONGOPW \
  -e MONGO_HOST=localhost \
  -e MONGO_PORT=8956 \
  -e MONGO_DBNAME=unifi \
  -e MONGO_AUTHSOURCE=admin \
# ports used, cannot change:
#  8443
#  3478
#  10001
#  8080
#  1900
#  8843
#  8880
#  6789
#  5514
  -v /home/josh/unifi/config:/config \
  --name unifi \
  lscr.io/linuxserver/unifi-network-application:latest
ExecStop=/usr/bin/podman stop --ignore --cidfile=%t/%n.ctr-id
ExecStopPost=/usr/bin/podman rm -f --ignore --cidfile=%t/%n.ctr-id
Type=notify
NotifyAccess=all

[Install]
WantedBy=default.target
Load, start, and enable the systemd service:
sudo chmod 664 /etc/systemd/system/mongo-unifi.service /etc/systemd/system/unifi.service
sudo systemctl daemon-reload
sudo systemctl start unifi
sudo systemctl enable unifi
Setup Paperless-ngx link
This uses Podman Quadlets which requires podman version >=4.4.
Ensure that you're using the netavark network backend (we need it to support container name DNS so we can connect to a container by its name), you can check by running:
podman info --format {{.Host.NetworkBackend}}If it says "cni", you need to switch to netavark by configuring it in /etc/containers/containers.conf. If /etc/containers/containers.conf doesn't exist, create it by copying the default containers.conf:
cp /usr/share/containers/containers.conf /etc/containers/containers.confThen edit /etc/containers/containers.conf to ensure it contains these lines, then it's easiest to just reboot the whole machine:
[network]
network_backend = "netavark"
Create a new subdirectory for our quadlet files:
mkdir /etc/containers/systemd/paperless-ngxCreate the following files in /etc/containers/systemd/paperless-ngx:
/etc/containers/systemd/paperless-ngx/paperless-ngx.network:
[Unit]
Description=Paperless-ngx container network/etc/containers/systemd/paperless-ngx/paperless-ngx-redis.container:
[Unit]
Description=Paperless-ngx's Redis broker container

[Service]
Restart=always

[Container]
ContainerName=paperless-ngx-redis
Image=docker.io/library/redis:8
AutoUpdate=registry
Network=paperless-ngx.network
Volume=/home/josh/media/paperless-ngx/redisdata:/data/etc/containers/systemd/paperless-ngx/paperless-ngx-gotenberg.container:
[Unit]
Description=Paperless-ngx's Gotenberg container

[Service]
Restart=always

[Container]
ContainerName=paperless-ngx-gotenberg
Image=docker.io/gotenberg/gotenberg:8.25
AutoUpdate=registry
Network=paperless-ngx.network
Exec=gotenberg --chromium-disable-javascript=true --chromium-allow-list=file:///tmp/.*/etc/containers/systemd/paperless-ngx/paperless-ngx-tika.container:
[Unit]
Description=Paperless-ngx's tika container

[Service]
Restart=always

[Container]
ContainerName=paperless-ngx-tika
Image=docker.io/apache/tika:latest
AutoUpdate=registry
Network=paperless-ngx.network/etc/containers/systemd/paperless-ngx/paperless-ngx.container:
[Unit]
Description=Paperless-ngx web server container
Requires=paperless-ngx-redis.service
Requires=paperless-ngx-tika.service
Requires=paperless-ngx-gotenberg.service
After=paperless-ngx-redis.service
After=paperless-ngx-tika.service
After=paperless-ngx-gotenberg.service

[Service]
Restart=always

[Container]
ContainerName=paperless-ngx
Image=ghcr.io/paperless-ngx/paperless-ngx:2.20.15
AutoUpdate=registry
Network=paperless-ngx.network
Volume=/home/josh/media/paperless-ngx/data:/usr/src/paperless/data
Volume=/home/josh/media/paperless-ngx/media:/usr/src/paperless/media
Volume=/home/josh/media/paperless-ngx/export:/usr/src/paperless/export
Volume=/home/josh/downloads/paperless-ngx-consume:/usr/src/paperless/consume
PublishPort=14244:8000
Environment=USERMAP_UID=1000
Environment=USERMAP_GID=1000
Environment=PAPERLESS_URL=oni.aaaa.ac
Environment=PAPERLESS_FORCE_SCRIPT_NAME=/paperless
Environment=PAPERLESS_STATIC_URL=/paperless/static/
Environment=PAPERLESS_SECRET_KEY=<any random string, it doesn't matter, it's used for generating session tokens>
Environment=PAPERLESS_TIME_ZONE=America/New_York
Environment=PAPERLESS_OCR_LANGUAGE=eng
Environment=PAPERLESS_OCR_LANGUAGES=chi-tra chi-sim kor jpn msa hin
Environment=PAPERLESS_REDIS=redis://paperless-ngx-redis:6379
Environment=PAPERLESS_TIKA_ENABLED=1
Environment=PAPERLESS_TIKA_GOTENBERG_ENDPOINT=http://paperless-ngx-gotenberg:3000
Environment=PAPERLESS_TIKA_ENDPOINT=http://paperless-ngx-tika:9998

[Install]
WantedBy=default.target
Reload systemd services:
systemctl daemon-reloadStart the services:
systemctl start paperless-ngxDon't need to run systemctl enable paperless-ngx service, it's automatically enabled in the *.container files when we added the WantedBy directive.
Setup qBittorrent with Wireguard link
Using podman quadlet link
Create a systemd service file /etc/containers/systemd/qbittorrent-wg.container:
[Unit]
Description=Start qBittorrent + Wireguard container
Wants=network-online.target
After=network-online.target
After=zfs-mount.service

[Service]
Restart=on-failure
TimeoutStopSec=70

[Container]
ContainerName=qbittorrent-wg
Image=docker.io/themacguffinman/qbittorrent-wg:latest@sha256:e5c40e7d3fc002f2623afb67c645001a87c56627452a7eb06eb6cbe6b0adbbc3
PodmanArgs=--security-opt=apparmor=podman
AddCapability=NET_ADMIN
AddCapability=SYS_NICE
Sysctl=net.ipv4.conf.all.src_valid_mark=1
PublishPort=4722:4722
Environment=WEBUI_PORT=4722
Environment=TZ=America/New_York
Environment=PUID=1000
Environment=PGID=1000
Environment=WG_INTERFACE="<wg-conf-name>"
Environment=TORRENTING_PORT=34524
Environment=NICE=9
Environment=IONICE_CLASS=idle
Volume=/home/josh/qbittorrent_config:/config
Volume=/home/josh/misc_logs/qbittorrent_logs:/config/qBittorrent/logs
Volume=/home/josh/downloads/wg_confs:/wg_confs
Volume=/home/josh/media/downloads:/downloads
Volume=/home/josh/qbittorrent_incomplete:/temp_downloads
Volume=/home/josh/media/qbittorrent_torrents:/torrent_export

[Install]
WantedBy=default.target
Generate and start the quadlet:
sudo systemctl daemon-reload
sudo systemctl start qbittorrent-wg
Setup Netdata system monitoring link
Install the netdata package from the repo.netdata.cloud repository:
curl -fsSL https://repo.netdata.cloud/netdatabot.gpg.key | sudo gpg --dearmor -o /usr/share/keyrings/netdatabot.gpg
echo "deb [signed-by=/usr/share/keyrings/netdatabot.gpg] https://repo.netdata.cloud/repos/stable/ubuntu/ noble/" | sudo tee -a /etc/apt/sources.list.d/netdata.list
sudo apt update
sudo apt install netdata
Edit the main netdata configuration file with the provided edit-config script:
cd /etc/netdata
sudo ./edit-config netdata.conf
Make sure /etc/netdata/netdata.conf roughly looks like this:
[global]
    run as user = netdata

    # the default database size - 1 hour
    # 1209600 = 14 days
    history = 1209600

    # some defaults to run netdata with least priority
    process scheduling policy = idle
    OOM score = 1000

[web]
    web files owner = root
    web files group = netdata

    # by default do not expose the netdata port
    bind to = localhost
    allow connections from = localhost
Restart and enable the netdata systemd service:
sudo systemctl restart netdata
sudo systemctl enable netdata
Since you configured netdata to only work on localhost, you'll need to setup a reverse proxy (see Caddy section).
Setup dynamic DNS with Cloudflare & inadyn link
Install inadyn:
sudo apt install inadynEdit /etc/inadyn.conf to look like this:
period = 300
allow-ipv6 = true # required option for IPv6 atm.
verify-address = false

# Create a unique custom API token with the following permissions:
# -> Zone.Zone - Read, Zone.DNS - Edit.
# With multiple usernames at the same provider, index with :#
provider cloudflare.com:1 {
    username = aaaa.ac # zone.name
    password = <Cloudflare API key>
    hostname = home.aaaa.ac
    ttl = 1 # optional, value of 1 is 'automatic'.
    proxied = false # optional.
}
provider cloudflare.com:2 {
    username = aaaa.ac # zone.name
    password = <Cloudflare API key>
    hostname = home.aaaa.ac
    ttl = 1 # optional, value of 1 is 'automatic'.
    proxied = false # optional.
    checkip-command = "ip addr show enp6s0 | awk '/inet6 / {split($2, a, \"/\"); print a[1]}' | grep -v '^fe80\|^fd'"
}
provider cloudflare.com:3 {
    username = aaaa.ac # zone.name
    password = <Cloudflare API key>
    hostname = ipv4.home.aaaa.ac
    ttl = 1 # optional, value of 1 is 'automatic'.
    proxied = false # optional.
}
provider cloudflare.com:4 {
    username = aaaa.ac # zone.name
    password = <Cloudflare API key>
    hostname = localoni.aaaa.ac
    ttl = 1 # optional, value of 1 is 'automatic'.
    proxied = false # optional.
    checkip-command = "ip addr show enp6s0 | awk '/inet / {split($2, a, \"/\"); print a[1]}'"
}
provider cloudflare.com:5 {
    username = aaaa.ac # zone.name
    password = <Cloudflare API key>
    hostname = unifi.aaaa.ac
    ttl = 1 # optional, value of 1 is 'automatic'.
    proxied = false # optional.
    checkip-command = "ip addr show enp6s0 | awk '/inet / {split($2, a, \"/\"); print a[1]}'"
}
provider cloudflare.com:6 {
    username = aaaa.ac # zone.name
    password = <Cloudflare API key>
    hostname = ipv6.oni.aaaa.ac
    ttl = 1 # optional, value of 1 is 'automatic'.
    proxied = false # optional.
    checkip-command = "ip addr show enp6s0 | awk '/inet6 / {split($2, a, \"/\"); print a[1]}' | grep -v '^fe80\|^fd'"
}
Restart inadyn:
systemctl restart inadynCheck your video files for errors link
Fast test (checks video metadata for errors):
ffprobe video.mkvThorough test (re-encodes the video into null, outputs errors into a log file):
ffmpeg -v error -i video.mkv -f null - 2>errors.logIf you get an error message like Too many packets buffered for output stream 0:1, set a higher -max_muxing_queue_size integer until it works (bug), eg:
ffmpeg -v error -i video.mkv -max_muxing_queue_size 5000 -f null - 2>errors.logSetup a Caddy reverse proxy link
Download a caddy binary with the dns.providers.cloudflare module from https://caddyserver.com/download into ~/caddy/bin/caddy. Make sure to give it root executable permission:
sudo chmod +x ~/caddy/bin/caddyCreate the Caddyfile in ~/caddy/Caddyfile:
oni.aaaa.ac, localoni.aaaa.ac {
	redir /komga /komga/ temporary
	reverse_proxy /komga/* localhost:8217

	redir /transmission /transmission/web/ temporary
	redir /transmission/ /transmission/web/ temporary
	redir /transmission/web /transmission/web/ temporary
	reverse_proxy /transmission/* localhost:9091

	redir /netdata /netdata/ temporary
	handle /netdata/* {
		uri strip_prefix /netdata
		reverse_proxy localhost:19999
	}

	redir /qbt /qbt/ temporary
	handle /qbt/* {
		uri strip_prefix /qbt
		reverse_proxy localhost:4722
	}

	redir /paperless /paperless/ temporary
	reverse_proxy /paperless/* localhost:14244

	tls {
		dns cloudflare {env.CLOUDFLARE_API_TOKEN}
	}
}

audiobookshelf.aaaa.ac {
	encode gzip zstd
	reverse_proxy localhost:13378

	tls {
		dns cloudflare {env.CLOUDFLARE_API_TOKEN}
	}
}

unifi.aaaa.ac {
	reverse_proxy localhost:8443 {
		transport http {
			tls_insecure_skip_verify
		}
	}

	tls {
		dns cloudflare {env.CLOUDFLARE_API_TOKEN}
	}
}

ha.aaaa.ac {
	reverse_proxy localhost:8123

	tls {
		dns cloudflare {env.CLOUDFLARE_API_TOKEN}
	}
}
Create a systemd service file /etc/systemd/system/local-caddy.service:
[Unit]
Description=Caddy (using local binary)
Documentation=https://caddyserver.com/docs/
After=network.target network-online.target
Requires=network-online.target

[Service]
# insert a Cloudflare API token with permission to read and edit DNS zones
Environment="CLOUDFLARE_API_TOKEN=..."
User=caddy
Group=caddy
ExecStart=/home/josh/caddy/bin/caddy run --environ --config /home/josh/caddy/Caddyfile
ExecReload=/home/josh/caddy/bin/caddy reload --config /home/josh/caddy/Caddyfile
TimeoutStopSec=5s
LimitNOFILE=1048576
LimitNPROC=512
PrivateTmp=true
ProtectSystem=full
AmbientCapabilities=CAP_NET_BIND_SERVICE

[Install]
WantedBy=multi-user.target
Load, start, and enable the systemd service:
sudo chmod 664 /etc/systemd/system/local-caddy.service
sudo systemctl daemon-reload
sudo systemctl enable local-caddy
sudo systemctl start local-caddy
Whenever you edit ~/caddy/Caddyfile, reload the config with:
sudo systemctl reload local-caddySetup wireguard server link
Install wireguard
sudo apt install wireguard-toolsGenerate two files peer.key and peer.pub which are a private & public key pair:
wg genkey > peer.key
wg pubkey < peer.key > peer.pub
Create a file called /etc/systemd/network/99-wg0.network that looks like this:
[Match]
Name=wg0

[Network]
Address=10.68.69.0/24
Create a file called /etc/systemd/network/99-wg0.netdev that looks like this:
[NetDev]
Name=wg0
Kind=wireguard
Description=oni home wireguard network

[WireGuard]
ListenPort=42069
PrivateKey=<private key contents in peer.key file we generated earlier>

[WireGuardPeer]
PublicKey=<the public key of whoever I want to allow to connect>
AllowedIPs=10.68.69.2/32
That file contains secrets, so set restrictive file permissions:
sudo chown root:systemd-network /etc/systemd/network/99-wg0.netdevPort forward the ListenPort on UDP on your internet router/gateway.
Restart systemd-networkd service:
sudo systemctl restart systemd-networkdInstall a headless Windows VM link
Install qemu & kvm (and socat which is used in a systemd service):
sudo apt install qemu-kvm socatCreate a disk image in a ~/vm dir:
mkdir ~/vm
cd ~/vm
qemu-img create -f raw windows.img 300G
(note: creating a raw image has severale advantages: if your filesystem supports sparse files, it only uses the actually used space of your virtual disk on your physical disk.. all journalling filesystems that use inodes support that, so ext4 for example works fine. second you can easily mount it using mount -o loop
You need to download the virtio driver image into ~/vm:
cd ~/vm
wget https://fedorapeople.org/groups/virt/virtio-win/direct-downloads/stable-virtio/virtio-win.iso
Download a Windows installation ISO into ~/vm too, I think you'll need a version that has had TPM requirements removed.
Run this command to start a basic VM that boots into the installation media:
sudo qemu-system-x86_64 -enable-kvm \
-k en-us \
-name windows \
-vnc :1 \
-drive file=/home/josh/vm/virtio-win.iso,media=cdrom \
-drive file=/home/josh/vm/<windows installation iso file>,media=cdrom \
-boot d \
-drive file=/home/josh/vm/windows.img,if=virtio,format=raw,index=0 \
-net nic,model=rtl8139 -net user,hostname=windowsvm \
-cpu host \
-m 4096
Connect via VNC (no authentication) on port 5901
During installation at the partition step Windows doesn't detect the VirtIO hard drive. Windows will require the viostor driver from the virtio driver image we downloaded earlier above.
Create a systemd service file /etc/systemd/system/qemu-windows.service:
[Unit]
Description=Windows VM (QEMU)

[Service]
Type=forking
PIDFile=/run/qemu_windows.pid

ExecStart=/usr/bin/qemu-system-x86_64 -machine accel=kvm -enable-kvm \
-k en-us \
-name windows,debug-threads=on \
-drive file=/home/josh/vm/virtio-win.iso,media=cdrom \
-boot c \
-drive file=/home/josh/vm/windows.img,if=virtio,format=raw,index=0 \
-net nic,model=rtl8139 -net user,hostname=windowsvm \
-cpu host \
-m 4096 \
-daemonize -pidfile /run/qemu_windows.pid \
-monitor unix:/tmp/qemu_windows.sock,server,nowait \
-usb -device usb-tablet \
-vnc :1 \

ExecStop=/bin/sh -c 'while test -d /proc/$MAINPID; do /usr/bin/echo system_powerdown | /usr/bin/socat - UNIX-CONNECT:/tmp/qemu_windows.sock; sleep 3; done'

TimeoutStopSec=1m

[Install]
WantedBy=multi-user.target
Use QXL graphics drivers with the SPICE RDP protocol link
Download Windows SPICE guest tools from https://www.spice-space.org/download.html and install it on the Windows guest.
Add qemu options to qemu-windows.service with:
-vga qxl -device virtio-serial-pci \
-spice port=5930,disable-ticketing=on \
-device virtserialport,chardev=spicechannel0,name=com.redhat.spice.0 \
-chardev spicevmc,id=spicechannel0,name=vdagent \
Install virt-viewer which is a SPICE client:
sudo apt install virt-viewerNote: virt-viewer's desktop shortcut is called "Remote Viewer".
Learn more: https://wiki.psuter.ch/doku.php?id=windows_vm_in_kvm_on_headless_ubuntu_server Learn more: https://wiki.gentoo.org/wiki/QEMU/Windows_guest Learn more: https://gist.github.com/zegelin/e566e2f0893977920a784ed29803f528 Learn more: https://wiki.archlinux.org/title/QEMU#SPICE
Setup rasdaemon to monitor ECC RAM errors link
https://www.setphaserstostun.org/posts/monitoring-ecc-memory-on-linux-with-rasdaemon/
Install rasdaemon:
sudo apt install rasdaemonStart systemd service (it should be enabled by default):
systemctl start rasdaemonUse ras-mc-ctl to read errors:
ras-mc-ctl --error-countHome Assistant in container link
Setup the Home Assistant web server link
Create the config dir mkdir -p /home/josh/media/homeassistant/config.
Create a quadlet container file /etc/containers/systemd/homeassistant.container:
[Unit]
Description=Home Assistant container
Wants=network-online.target
After=network-online.target
After=zfs-mount.service

[Service]
Restart=on-failure

[Container]
ContainerName=homeassistant
Image=ghcr.io/home-assistant/home-assistant:stable
AutoUpdate=registry
Network=host
Environment=TZ=America/New_York
Volume=/home/josh/media/homeassistant/config:/config
Volume=/run/dbus:/run/dbus:ro
Unmask=all
SecurityLabelDisable=true
AddCapability=all
SeccompProfile=unconfined

[Install]
WantedBy=default.target
Generate and start the quadlet:
sudo systemctl daemon-reload
sudo systemctl start homeassistant
Easily the update container image:
sudo podman auto-updateEdit the Home Assistant configuration yaml (/home/josh/media/homeassistant/config/configuration.yaml) to allow reverse proxying by appending the following lines:
http:
  cors_allowed_origins:
   - https://ha.aaaa.ac
  use_x_forwarded_for: true
  trusted_proxies:
   - 127.0.0.1
   - ::1
   - 192.168.0.0/16
Note that the trusted_proxies section cannot just specify the loopback address and needs to contain the LAN address of the server, so I just added the whole LAN subnet 192.168.0.0/16.
Restart the Home Assistant container:
sudo systemctl restart homeassistant